> ## Documentation Index
> Fetch the complete documentation index at: https://docs.rankwit.ai/llms.txt
> Use this file to discover all available pages before exploring further.
# Introduction
> Welcome to RankWit AI. Learn what you can do and where to find everything.
# Getting Started - RankWit AI Onboarding Guide
[RankWit AI ](https://www.rankwit.ai/)empowers brands to monitor and improve their visibility across the new frontier of AI Search, including AI Search Engines like [**ChatGPT**](https://chatgpt.com/), [**Perplexity**](https://www.perplexity.ai/), [**Gemini**](https://gemini.google.com/), and [**Google AI Overviews**](https://en.wikipedia.org/wiki/AI_Overviews).
## Step-by-Step Onboarding Process
Set up your brand monitoring in just **6 easy steps** with our guided onboarding.
**Step 1 - Sign in with magic link**
Insert your **work email address** and check your inbox for the **verification link**.
 **Step 2 - Create Your First Workspace**
Enter your **brand name** and **website URL**, then select your **target location**. For international businesses, choosing **"Global"** ensures your AI research and visibility insights are correctly geolocalized.
**Step 2 - Create Your First Workspace**
Enter your **brand name** and **website URL**, then select your **target location**. For international businesses, choosing **"Global"** ensures your AI research and visibility insights are correctly geolocalized.
 **Step 3 - Select a plan**
**Try for free** or **choose the plan** that fits your goals.
**Step 3 - Select a plan**
**Try for free** or **choose the plan** that fits your goals.
 **Step 4 - Generation of the prompts**
Once the website crawling is complete, head over to the **'Pages'** section, **select the relevant pages**, and click to **'Generate Prompt'**.
**Step 4 - Generation of the prompts**
Once the website crawling is complete, head over to the **'Pages'** section, **select the relevant pages**, and click to **'Generate Prompt'**.
 After selecting your pages, you can customize the output by **choosing the number of prompts to be generated** for each one. Simply select the quantity to ensure each page receives the right amount of prompts. In the first analysis you can use the suggested 5 prompt for each page.
 **Step 5 - Check and review the prompts**
Now, navigate to the **'Prompts'** section. This is your personal library where you can view all generated prompts; from here, you have the flexibility to **edit, delete, archive, or even add new ones manually**. If you wish to create new additional prompts from different pages, you can simply repeat the previous process. Once you are satisfied with your selection, proceed to the next step.
**Step 5 - Check and review the prompts**
Now, navigate to the **'Prompts'** section. This is your personal library where you can view all generated prompts; from here, you have the flexibility to **edit, delete, archive, or even add new ones manually**. If you wish to create new additional prompts from different pages, you can simply repeat the previous process. Once you are satisfied with your selection, proceed to the next step.
 **Step 6 - The first AI Runs**
Go to the **AI Runs** section (under Monitoring) to begin your initial analysis of how your prompts perform on generative engines like **ChatGPT, Perplexity, Gemini, and Google AI Overviews**. Once you click **'New Run'**, a side panel will appear, allowing you to customize your workflow by **selecting the AI models** and the **geographic location (Country)** for the search.
**Step 6 - The first AI Runs**
Go to the **AI Runs** section (under Monitoring) to begin your initial analysis of how your prompts perform on generative engines like **ChatGPT, Perplexity, Gemini, and Google AI Overviews**. Once you click **'New Run'**, a side panel will appear, allowing you to customize your workflow by **selecting the AI models** and the **geographic location (Country)** for the search.
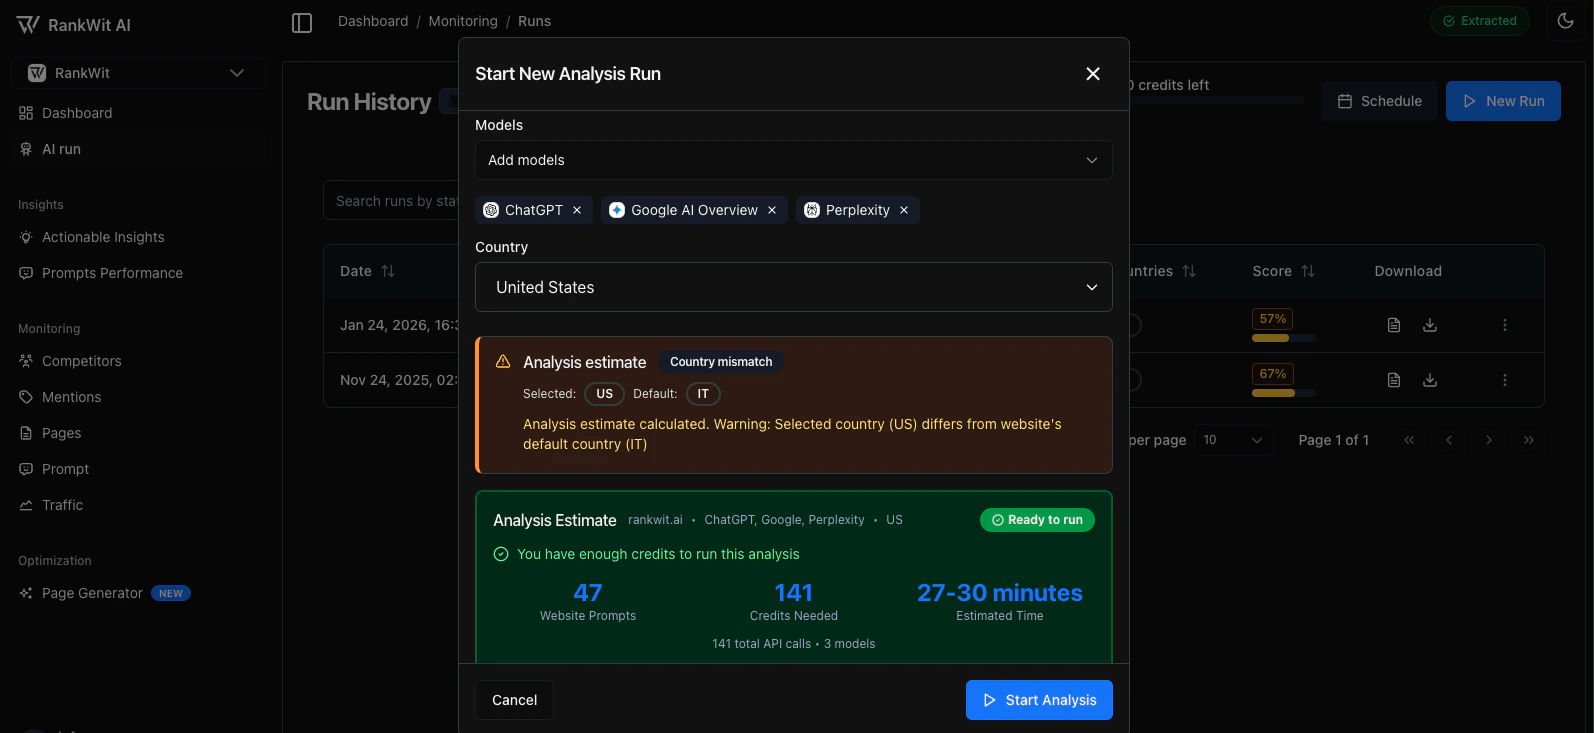
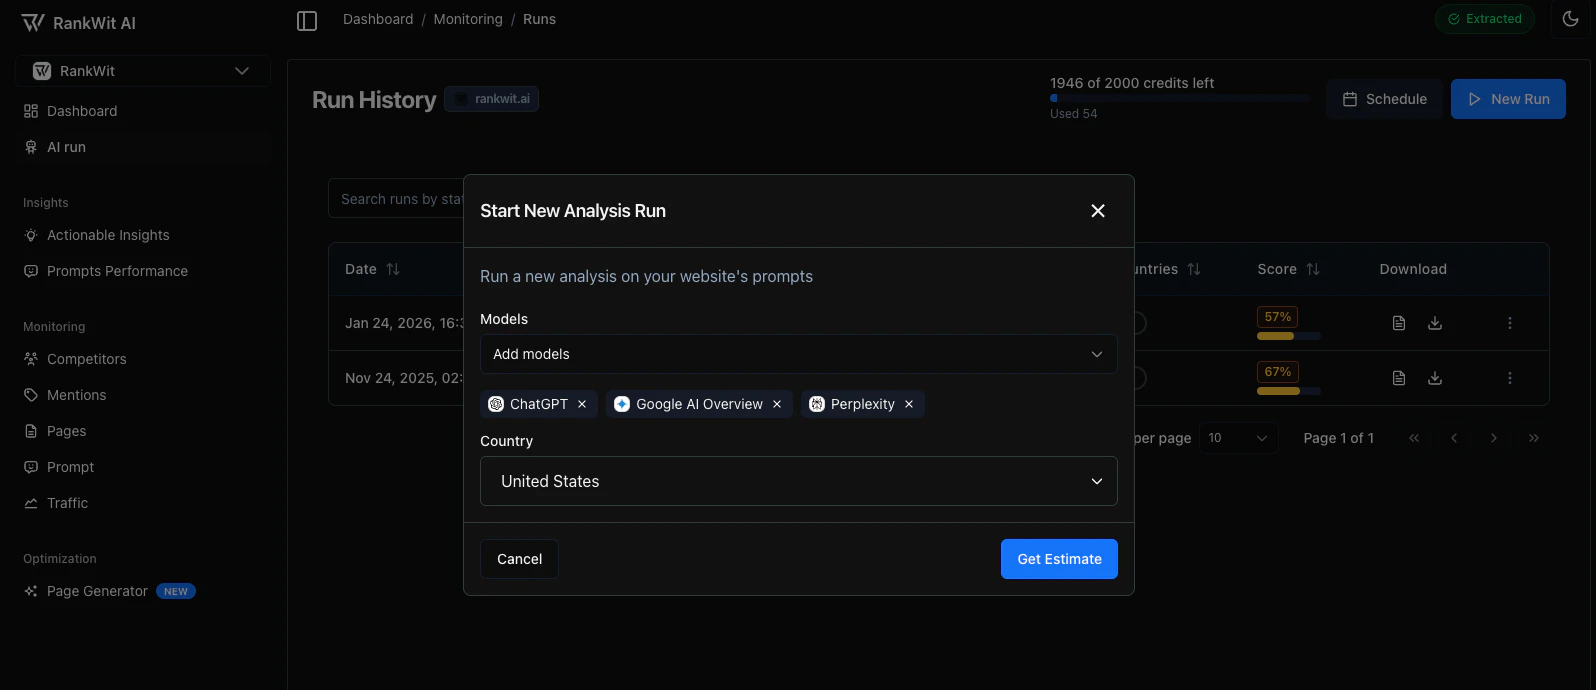 Click **'Estimate'** to view a calculation of the processing time and the credits required for your run. This step allows you to manage your resources before committing to the task. When you are satisfied with the estimate, click **'Start Analysis'** to initiate the workflow.
 ## All it's done. What you can do now
 * **Dashboard** — View your **overall visibility score** and key performance metrics.
* **AI Runs** — Launch **new runs**, schedule analyses, and manage your **report and history**.
* **Monitoring** — Track **competitors**, **mentions**, **pages**, **prompts**, and **traffic** in one place.
* **Insights** — Get **actionable insights** and **prompts performance** to know where to focus.
* **Optimization** — Use the **page generator** to create and improve content with AI.
* **Workspace** — Manage **account settings, billing, and integrations** for your project.
## Language
The app is available in **English** and **Italian**. You can switch language from the interface or from **Workspace → Settings**.
If you’re new, complete the onboarding when prompted and add at least one website to see data in Monitoring and Insights.
Next: [Credits](/overview/credits) or [FAQ](/overview/faq), or jump to [Monitoring](/monitoring/competitors) to start using your data
* **Dashboard** — View your **overall visibility score** and key performance metrics.
* **AI Runs** — Launch **new runs**, schedule analyses, and manage your **report and history**.
* **Monitoring** — Track **competitors**, **mentions**, **pages**, **prompts**, and **traffic** in one place.
* **Insights** — Get **actionable insights** and **prompts performance** to know where to focus.
* **Optimization** — Use the **page generator** to create and improve content with AI.
* **Workspace** — Manage **account settings, billing, and integrations** for your project.
## Language
The app is available in **English** and **Italian**. You can switch language from the interface or from **Workspace → Settings**.
If you’re new, complete the onboarding when prompted and add at least one website to see data in Monitoring and Insights.
Next: [Credits](/overview/credits) or [FAQ](/overview/faq), or jump to [Monitoring](/monitoring/competitors) to start using your data